To create a Data.Connect routine for Micronet Sales Force Automation:
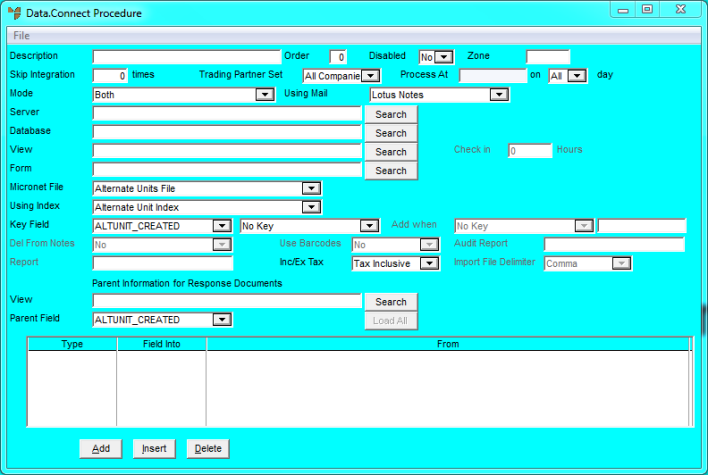
Micronet displays the Data.Connect Procedure screen.
|
|
Field |
Value |
|
|
Description |
Enter a short description for the procedure. |
|
|
Order |
Enter 1. This procedure should run first. |
|
|
Skip Integration |
This relates to when Data.Connect initiates all procedures. Enter the number of times you want this procedure to be skipped during initiation. |
|
|
Mode |
Select Picking Slip from Directory. Select Yes to the popup question ‘Load PDA fields for PDA invoice import’. This will load the default Orders Directory field type at the bottom of the Data.Connect Procedure screen, with a default value of "orders" in the From field. |
|
|
Using Mail |
Select one of the following options if required:
|
|
|
Form |
Enter the type of file to be imported:
|
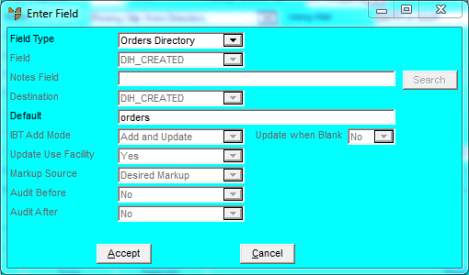
Micronet displays the Enter Field screen.
|
|
Field |
Value |
|
|
Field Type |
Micronet displays Orders Directory. Do not change this. |
|
|
Default |
Enter the full path name for the sales order files coming into Micronet, e.g. M:\msa27\data\orders. This is the directory where Data.Connect will search for the file to process. After the file is processed, it will be moved to a bk directory, i.e. orders from m:\msa27\data\orders will be moved to m:\msa27\data\ordersbk. A confirmation file will be created in a conf directory, i.e. orders from m:\msa27\data\orders will be moved to m:\msa27\data\ordersconf. |
Micronet redisplays the Data.Connect Procedure screen showing the path you entered for sales orders in the From field.
Micronet displays the Enter Field screen.

|
|
Field |
Value |
|
|
Field Type |
Select Micronet Default. |
|
|
Field |
Select DIH_SLIPPRIORITY. |
|
|
Destination |
Select DIH_SLIPPRIORITY. |
|
|
Default |
Enter the default slip priority you want, e.g. 50. |
Micronet redisplays the Enter Field screen.
Micronet redisplays the Data.Connect Procedure screen showing the field you added.
|
|
|
Technical Tip After your End of Month rollover has been run, you can delete the contents of the directory \PDA\ordersbk. This directory contains all sales force orders created on field PDAs and processed into Micronet via Data.Connect. |
